Showing posts with label crafts. Show all posts

Monday, March 19, 2012

Candle Re-Making

I had a few old candles that could no longer burn well, but had enough wax left to want to keep.  I read somewhere that it was easy to melt down candles and pour them into new vessels, so I gave it a whirl.
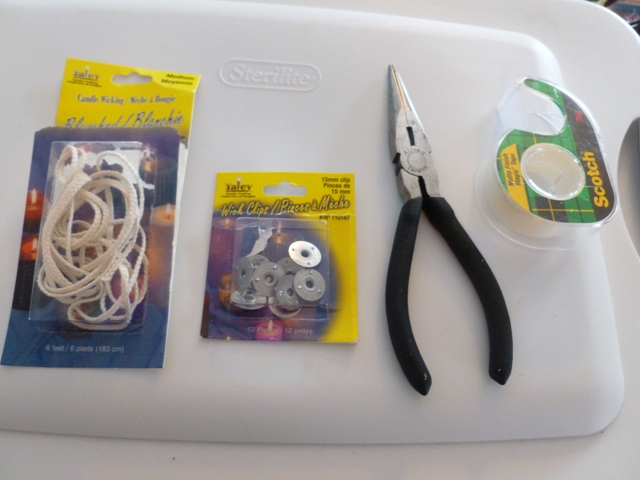
Here are the supplies you need for your new candles: Wicks and wick clips, pliers to crimp the clips and some tape to hold the wick over the jar with a pencil.  You'll also need either new jars or clean and reuse the ones you are taking your old wax out of.
They also sell some kind of wax to stick the clip to the bottom of the jar, but all you need to do is dip it into the hot wax before placing it in the jar.
I melted the wax in its original glass container in one small pan on medium heat, and large chunks of an old pillar candle in a glass bowl over a pan with an inch of water.  Don't let the water boil, it should just be at a low simmer in the pan.

Here is the candle starting to be re-made.  I reused this candle jar since it had Christmas decorations on it, and I was using green, red, and white wax.

I had so little red wax left that the other colors overpowered it!  I ended up mixing together a different green shade and a cream shade for the top layer, thinking it would be lighter green- it unfortunately turned out brown :(  It was my first time doing this, so I'll know better for next time.

The finished first candle, ready for December :)

The second candle I simply filled with plain white wax- my sister decorated this dollar store candle jar years ago for a party favor, and it still looked so cute I decided to reuse it too!

One tip I would offer:  Don't use plastic to melt or pour the wax- all the glass bowls I used cleaned up nicely, but the plastic measuring cup I used to pour the melted was was a pain to clean!  I got it all out, but scratched my Pampered Chef measuring cup in the process :(

New Candles for very little money!
Happy Candle Making
~Sally

Monday, February 13, 2012

Valentine's Day Crayon Hearts


I found inspiration for these on Pinterest (as usual) and started collecting old broken crayons destined for the garbage.

The Pinterest post I copied


I was about to give up the idea because I didn't want to spend money and time to hunt down silicone heart molds, but then I stumbled across some heart ice cube trays in the Target dollar spot (I think they were $2.50).  Then it was ON!

I love a bargain.  I am my mother's daughter in a lot of ways (but she is the bargain QUEEN).

So, since these cheap molds were not silicone as far as I could tell, I wasn't sure about their heat limits.  I cut the crayons in much smaller pieces and used my toaster oven around 150-200 degrees and it worked just fine.

If I did this again though, I would fill the cups even more.  The crayons are pretty thin and won't last too long.  At least they're cute!

Sunday, February 12, 2012

Spring Felt Flower Yarn Wreath


I felt like making a new wreath a couple weeks ago as I was home with sick kiddos, so I found some inspiration from these two pictures:

I liked the yarn wrapping and while shopping at Goodwill one day, I happened to find a ball of tan yarn and decided to use it to try making one of these.

The process was pretty simple:

Monday, December 12, 2011

Outdoor Winter Containers

A few weeks ago I saw a demonstration at MOPs on how to create winter containers with the planter pots you have outside from summer. They are supposed to last all winter long and add some beauty to the bare winter landscape. The other ladies in my group agreed that they were cool, but none of us really expected to do these on our own. This is where I got the idea that it was a really good excuse for a party! These would cost between $50 and $130 ready-made at the nursery I shopped at, so for around $20 a pop by doing it together and buying supplies in bulk, it was great! We even made a few as gifts. I invited the other ladies to my garage for an evening of creating. I picked up supplies at local nursery and craft stores (one of us called around first to find the best prices on greens). I picked up the greens (spruce tops, evergreen and other green accents) which ended up costing us about $15 per pot since we bought in bulk. The guests brought any extras they would like to make their pot prettier (ribbon, metal plaques, wooden reindeer, and lighted branches). I also picked up some additional colorful and sparkly things like plastic berries, curly twigs and fake glittery branches to dress up the pots. Fake glitter snowflake ornaments were also a popular addition.

Here is how we set it up:

Saturday, November 26, 2011

Real Life While Crafting

You can probably imagine hours of crafting (and thus neglecting the house) would create quite the chaotic mess.  If I didn't share what really went on while I was spending time crafting with three young kids in the house, it wouldn't really be fair to you.   It's easy to assume, based on pretty pictures on a blog, that everything else in my life is as "perfect" as the wreath-making looked!  As if I have endless free time...
The photos of wreath-making steps were taken spread out all through a few days.  First was the painting and then a week or so later two days of actual wreath-making.  One of those days was Thanksgiving, so my hubby was home to help out!  There were also plenty of interruptions.
Make sure before you start a project that you have a space to work in- I just started on the floor where my computer is (this is our dining room, but since our table is in the kitchen/family room area, we made this into sort of an office for now where the family computer lives).  It was like a ribbon, fabric and glittery decoration explosion.  Not to mention a couple of dangerous objects like wire cutters, scissors, and a hot glue gun thrown into the mix.  Thankfully my kids weren't very interested in the danger this time.
Don't go in, you might not come out!


Friday, November 25, 2011

Christmas Wreaths


I have been on a wreath kick the last couple of years.   When our front door isn't decorated, the house looks naked to me!  It started with buying wreaths.  I bought one or two.  They are SO expensive!!  So then I decided to make one, but the ready-made supplies for that weren't much cheaper.  The first one I made was just a plain evergreen wreath that I stuck store-bought pinecones-and-berries-on-sticks into.  Later, I made another one for indoors that I added lights to.  They are nice, but nothing spectacular.
Last year I made this one with the TONS of pinecones my kids had gathered from outside.

Thursday, November 17, 2011

Toddler Activity: Pom Pom bucket

I read about this activity on Money Saving Mom.  She has activities for little ones called Busy Bags, and one activity in this category was called "Pom Pom stuff-it-in" or something like that.  I thought it looked like a fun activity to do for my 2-year old, so I made one.
Super easy steps:
Stuffin' it in